07 - Object detection
Advanced Image Processing
Poznan University of Technology, Institute of Robotics and Machine Intelligence
![]()
Laboratory 7: Object detection
Introduction
In this laboratory, we’ll move beyond simple image classification and learn how to build models that can localize and identify multiple objects within a single image. The goal of object detection is twofold:
localization - identifying where each object is in the image, usually by predicting the spatial coordinates of its bounding box and visually drawing a tight bounding box around every object of interest,
classification - assigning a correct class label (like “cat,” “dog,” or “car”) to each detection.
As part of this class, we will train our own object detection model using the YOLO architecture. Moreover, we will cover the key components of an object detection pipeline, including how to process labeled data and how to evaluate performance using specialized metrics like Intersection over Union (IoU) and mean Average Precision (mAP).
Goals
The objectives of this laboratory are to:
- Understand the basics of object detection
- Learn how to train your own object detection model (YOLO)
- Familiarize with object detection metrics
Resources
- Good overview of the object detection task
- The benchmark of the best object detection models
- Ultralytics documentation
- YOLOv1 to YOLOv10: A comprehensive review of YOLO variants
Object detection
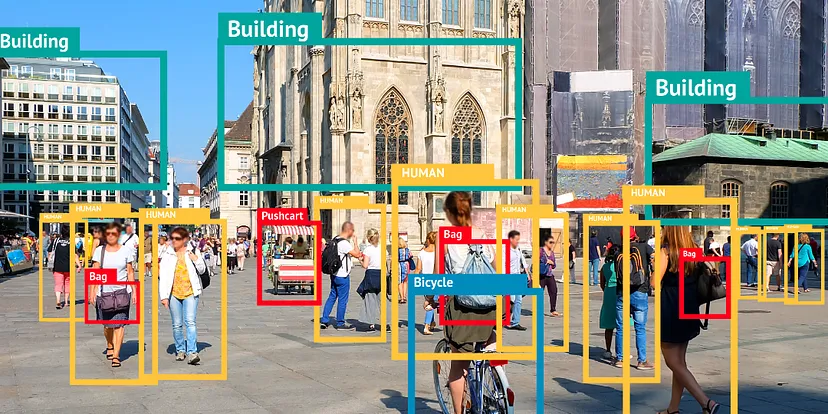
Source:
Top
10 Object Detection Models in 2023!
Object detection is a computer vision task that involves localizing one or more objects within an image and classifying each object in the image. The goal is to find the bounding box (rectangle) coordinates of each object in the image along with its class label.
Usually, object detection bounding boxes are defined:
using left-top corner (x1, y1) and right-bottom corner (x2, y2) coordinates:
(x1, y1, x2, y2)using left-top corner (x, y) and width and height:
(x, y, w, h)using center (x, y) and width and height:
(x, y, w, h)
Additionally, object detection results contain:
confidence score: a value that represents the probability that the detected object exists in the bounding box (“objectness score”),
class label: a label that represents the class of the detected object, usually represented as an integer value or a list of class probabilities
Note: Be careful with the bounding box format used in the dataset you are working with. If you are not sure, check the dataset documentation or visualize the bounding boxes to understand the format.
Object detection architectures
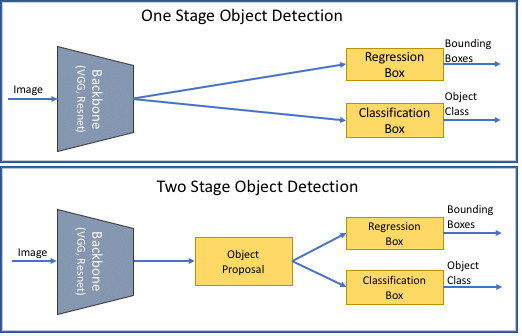
Source:
Semantic
Image Cropping
Object detection architectures can be divided into two main categories:
Two-stage detectors: These detectors first generate region proposals and then classify the regions. Examples of two-stage detectors are Faster R-CNN, R-FCN, and FPN.
One-stage detectors: These detectors directly predict the bounding boxes and class probabilities. Examples of one-stage detectors are YOLO, SSD, and RetinaNet.
Usually, two-stage detectors are more accurate but slower than one-stage detectors. The choice of the architecture depends on the application requirements, such as speed, accuracy, or computational resources. In most cases, one-stage detectors are usually preferred due to their speed and ability to run in real time.
Object detection metrics
Intersection over Union (IoU)
Intersection over Union is the foundational metric used to measure the accuracy of an object detector on a particular dataset, by measuring how much a predicted bounding box overlaps with the ground truth box.
To compute this metric we need ground-truth bounding boxes and model predicted bounding boxes. Then, the final score we can compute by dividing the area of overlap by the area of union (the area encompassed by both of them).
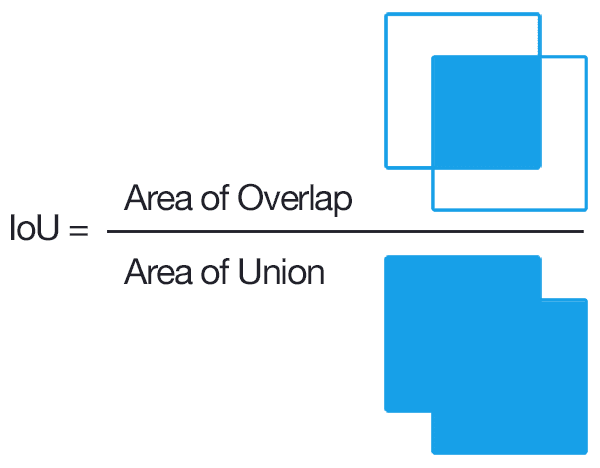
Graphical representation of Intersection over Union equation.
Image source:
PyImageSearch
Mean Average Precision (mAP)
Mean Average Precision (mAP) is the gold standard for measuring object detection performance, providing a single number that summarizes a model’s accuracy across all object classes and confidence levels. It is calculated by taking the mean of the average precision (AP) scores across multiple queries or object classes. A higher mAP score indicates a better-performing model.
\[ \text{mAP} = \frac{1}{classes} \sum_{i=1}^{classes} \frac{\text{TP}_i}{\text{TP}_i + \text{FP}_i} \]
YOLO (You Only Look Once)
One of the most popular one-stage object detection architectures, especially in real-time applications, is YOLO (You Only Look Once). YOLO is a series of fast and accurate object detection models. The first version of YOLO was introduced in 2016, and since then, several versions have been released, evolving the architecture and improving performance.
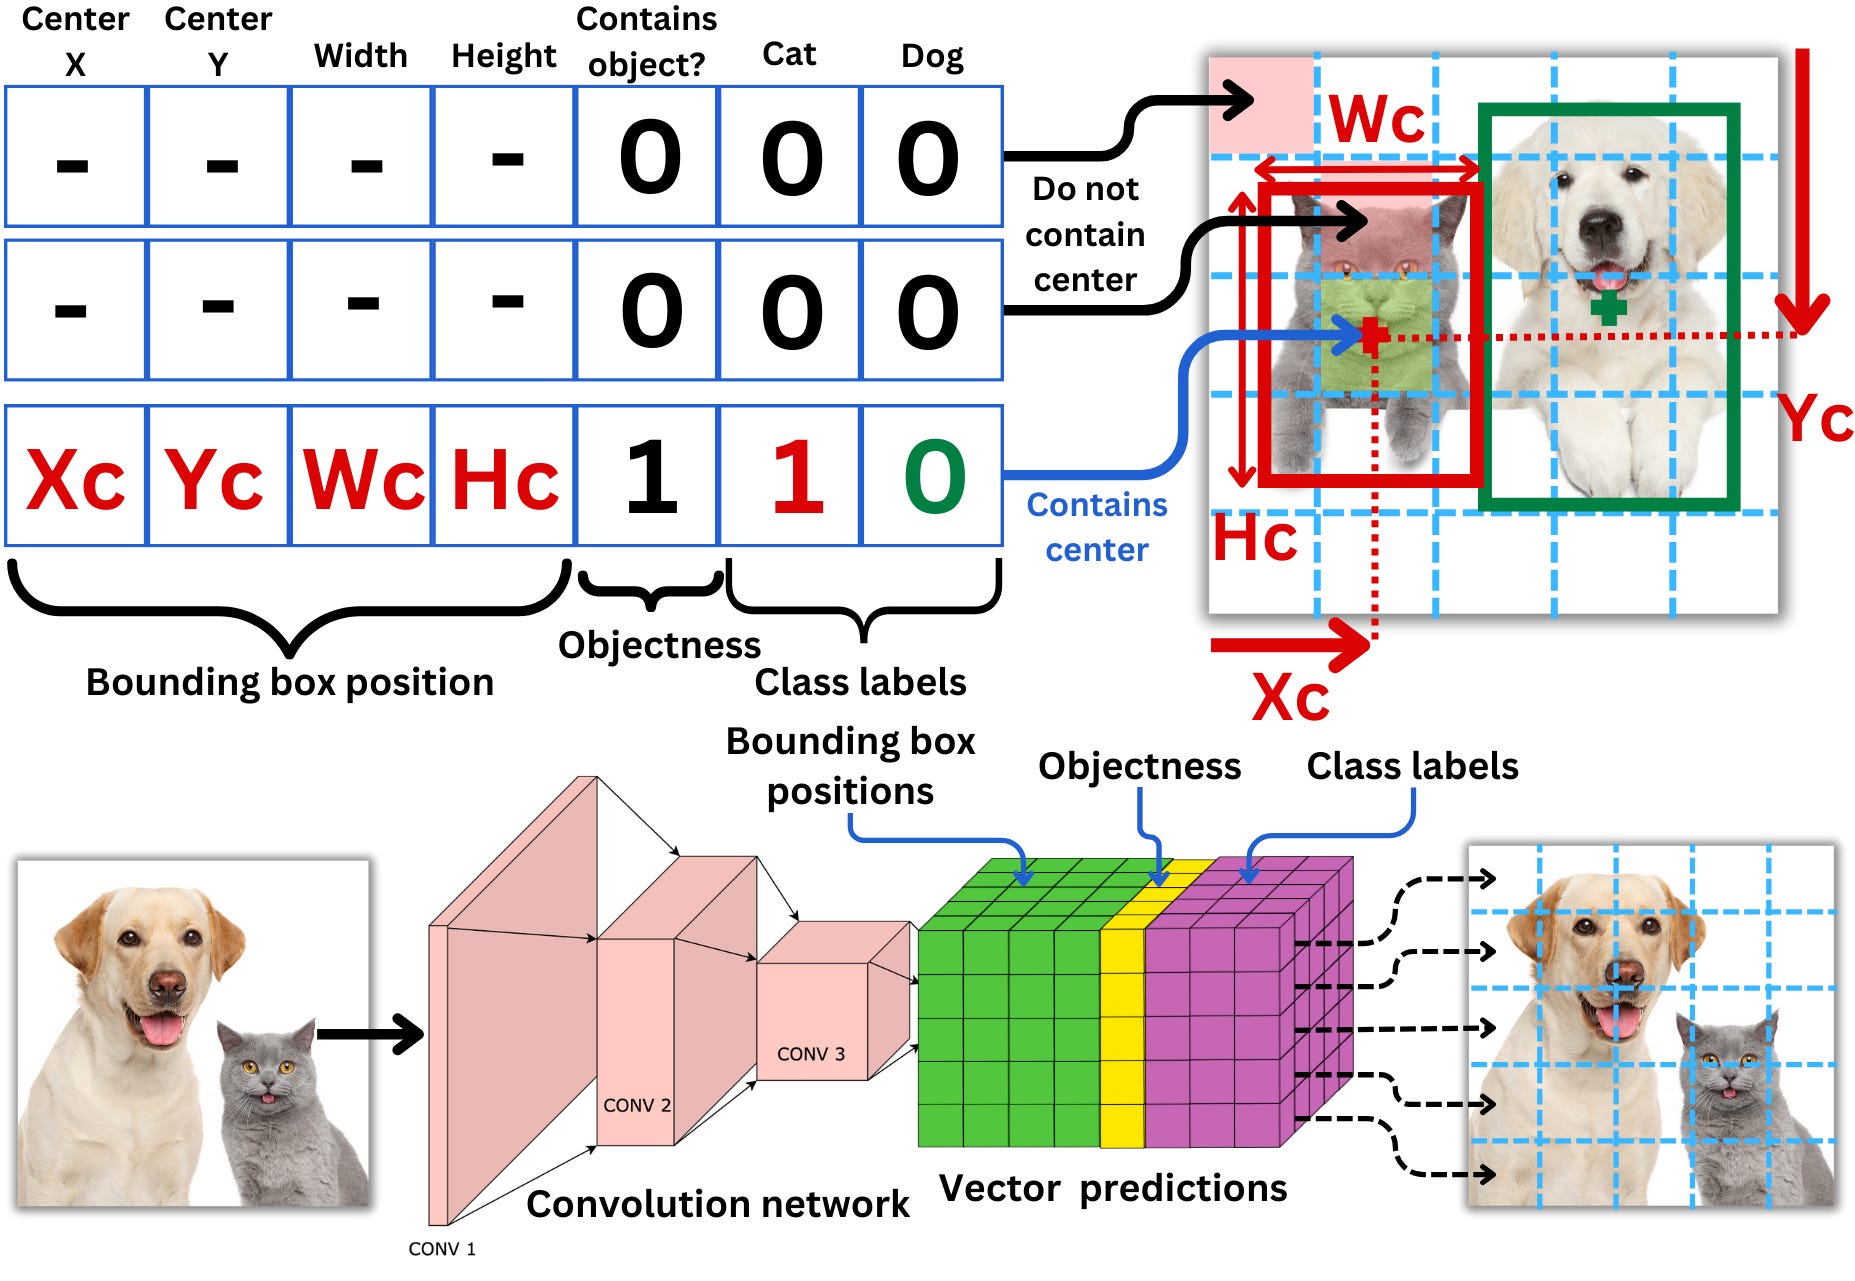
Source:
The
AiEdge+: Let’s Make Computer Vision Great Again!
The model is a simple convolutional network with the output of the last convolution layer having the dimensionality of the target to predict. This means that for each cell, the model will predict if there is an object (the center of a bounding box), the probability for each of the classes and the dimensions and positions of the resulting bounding boxes, this for each of the priors.
Because the model will likely predict multiple bounding boxes for the same object, it is necessary to select the best ones. The idea is to choose the box with the highest confidence score, measure its intersection area over union area (IoU) with all the other overlapping boxes of the same class, and remove all that are above a certain threshold. This is called non-maximum suppression. This ensures that boxes with high overlaps are merged into one.
Source: The AiEdge+: Let’s Make Computer Vision Great Again!
Requirements
A graphics processing unit (GPU) is required to train the object detection model. If you don’t have an NVIDIA GPU, you can use the CPU, but the training process will be very slow.
Install dependencies
pip install ultralyticsDataset
💥 Task 1 💥
Download the dataset. The below script will download the validation dataset from the COCO dataset (about 5000 images). The whole COCO dataset contains 118k images; therefore, we will use a subset of the dataset to speed up the training process during the laboratory.
01_download_dataset.bash
mkdir datasets
cd ./datasets
wget "http://images.cocodataset.org/zips/val2017.zip" -O val2017.zip
wget "https://github.com/ultralytics/assets/releases/download/v0.0.0/coco2017labels.zip" -O coco2017labels.zip
unzip val2017.zip
unzip coco2017labels.zip
rm val2017.zip
rm coco2017labels.zip
mkdir -p coco_val2017/images coco_val2017/labels
mv val2017/* coco_val2017/images/
mv coco/labels/val2017/* coco_val2017/labels/
rm -r val2017/ coco/
cd ../
Call this script in project directory with command:
bash 01_download_dataset.bashThe script generates the datasets directory with the
following structure:
datasets/
├── coco_val2017
│   ├── images
│   │   ├── 000000000139.jpg
│   │   ├── ...
│   │   └── 000000581781.jpg
│   └── labels
│       ├── 000000000139.txt
│       ├── ...
│       └── 000000581781.txt
Check out the sample labels. The labels are in the YOLO format, where the first column is the class index, and the following four columns are the bounding box coordinates in the format:
class x_center y_center width heightNote: Box coordinates are normalized to the image width and height, so they are in the range [0, 1].
💥 Task 2 💥
The original COCO dataset contains 80 classes, too many for our
purposes. Therefore, we will filter the dataset to keep labels only for
the classes specified in coco128_filtered.yaml
('person', 'bicycle', 'car', 'motorcycle', 'bus', and 'truck').
Check the 02_filter_labels.py script to see the
instructions.
The list of all COCO classes can be found here.
02_filter_labels.py
from glob import glob
import os
import numpy as np

### Desired classes ###

# names:
#   0: person
#   1: bicycle
#   2: car
#   3: motorcycle
#   4: bus
#   5: truck

### Original classes ###

# names:
#  0: person
#  1: bicycle
#  2: car
#  3: motorcycle
#  #
#  5: bus
#  #
#  7: truck
# ... to 79


# update the path if needed
PATH_TO_LABELS = 'datasets/coco_val2017/labels/'


def filter_file(file_path: str):
    """This function filters the labels of a single file.

    Parameters
    ----------
    file_path : str
        The path to the file to filter.
    """

    with open(file_path, 'r') as file:
        lines = file.read().split('\n')
        lines = [line.split(' ') for line in lines if line]

    new_lines = []

    for line in lines:
        # example line: ['0', '0.123', '0.456', '0.789', '0.012']

        # TODO: implement the filtering
        # 1. read the class_id as variable
        # 2. cast the class_id to integer
        # 3. filter the class_id
        # 3.1 - remap the class_id to the new class_id if needed
        # 3.2 - if the class_id is not in the desired classes, skip the line by using the `continue` statement
        # 4. overwrite the class_id in the line

        # <YOUR CODE HERE>


        ### TODO: END ###
        new_lines.append(line)

    with open(file_path, 'w') as file:
        for line in new_lines:
            file.write(' '.join(line) + '\n')

if __name__ == '__main__':
    for file_path in sorted(glob(os.path.join(PATH_TO_LABELS, '*.txt'))):
        filter_file(file_path)
When you fill all gaps in the script, run the command:
python3 02_filter_labels.pyValidate an example label to see if the script works correctly.
💥 Task 3 💥
As we use the validation subset of the COCO dataset, we need to split
the dataset into training and validation sets manually. Check the
03_split_dataset.py script to see the instructions.
03_split_dataset.py
from glob import glob
import os
import random

# update the path if needed
PATH_TO_IMAGES = 'datasets/coco_val2017/images/'


def generate_train_val_list(path_to_images: str, val_size: float = 0.2, seed: int = 42):
    """This function generates the train and val lists.

    Parameters
    ----------
    path_to_images : str
        The path to the images.
    val_size : float
        The size of the validation set.
    seed : int

    """

    random.seed(seed)
    images_list = sorted(glob(os.path.join(path_to_images, '*.jpg')))
    assert len(images_list) > 0, 'The image list should not be empty, check the PATH_TO_IMAGES variable'

    train_list, val_list = [], []

    # TODO: prepare the train and val lists
    # Note: please do it mannually, do not use sklearn or other libraries
    # 1. shuffle the image list using random.shuffle - note that random.shuffle does not return anything
    # 2. calculate the number of images in the validation set considering the val_size
    # 3. split the image list into train and val lists (train_list and val_list variables)

    # <YOUR CODE HERE>


    # TODO: END

    assert len(val_list) > 0, 'The validation set should not be empty'
    assert len(train_list) > 0, 'The training set should not be empty'
    assert len(train_list) + len(val_list) == len(images_list), 'The sum of the training and validation set should be equal to the number of images'
    assert len(train_list) > len(val_list), 'The training set should be larger than the validation set'

    with open('./datasets/train_list.txt', 'w') as f:
        for image_path in train_list:
            f.write(os.path.abspath(image_path) + '\n')

    with open('./datasets/val_list.txt', 'w') as f:
        for image_path in val_list:
            f.write(os.path.abspath(image_path) + '\n')


if __name__ == '__main__':
    generate_train_val_list(PATH_TO_IMAGES)
When you fill all gaps in the script, run the command:
python3 03_split_dataset.pyIt will generate train_list.txt and
val_list.txt files in the datasets directory.
Check the files to see if the script works correctly.
💥 Task 4 💥
Based on example,
create a dataset configuration file and named it
coco128_filtered.yaml. In the provided file, add the following
classes (section “names”) in the following order:
'person', 'bicycle', 'car', 'motorcycle', 'bus', and 'truck'.
Specify dataset root directory and train and validation data.
Training and validation
Note: All following scripts use a GPU. If you don’t have a GPU, you can use the
device=cpuparameter with every command. Using neural networks on a CPU is very slow, so be patient or reduce parameters likeimgszorbatch.
💥 Task 5 💥
Train the YOLO model using the pre-trained model
yolo11.pt weights. As we learned in the laboratory covering
transfer learning, this approach should improve the training results and
speed up the process.
Definitions of all training parameter are available here.
yolo detect train data=coco128_filtered.yaml model=yolo11n.pt epochs=20 imgsz=512 batch=16During the training process, you can check the
runs/detect/ directory to see the training progress and
generated plots.
💥 Task 6 💥
Evaluate the model using the validation dataset once the training process is finished.
For laboratory purposes, we ignore the testing subset, just evaluating on the validation subset.
yolo val data=coco128_filtered.yaml imgsz=640 batch=16 conf=0.25 iou=0.6 split=val model=<PATH_TO_BEST_MODEL.PT>Save the evaluation results to the results.txt file.
💥 Task 7 💥
Run and test the model on your own data. By specifying the
source parameter, you can use an image, video, or camera
stream, a file on your disk, or a URL to the image or video.
yolo predict data=coco128_filtered.yaml imgsz=640 model=<PATH_TO_BEST_MODEL.PT> source="<URL>"💥 💥 💥 Final assignment 💥 💥 💥
To complete the laboratory, upload the following files to the eKursy platform:
best.pt- the best model weightsresults.txt- a text file with the results of the model evaluation (results of theyolo valcommand)